Error Number 2 for Shark Robot refers to a specific error code or problem encountered while using the Shark Robot device. Shark Robot is a widely popular and efficient cleaning robot designed to provide convenience and ease in household cleaning tasks.
However, encountering Error Number 2 may indicate a malfunction or issue that needs to be resolved for the device to function correctly. To address this error, it is essential to understand the root cause and consult the manufacturer or customer support for assistance.
Resolving Error Number 2 will ensure the smooth operation and optimal performance of the Shark Robot in maintaining a clean and tidy living space.
Understanding Error Number 2 Shark Robot
If you’ve encountered Error Number 2 on your Shark Robot vacuum, don’t panic! This blog post is here to help you understand the error and guide you through troubleshooting steps to get your Shark Robot back up and running smoothly.

Common Causes Of Error Number 2
Before we proceed with the troubleshooting steps, let’s examine some common causes of Error Number 2 on your Shark Robot. By understanding these causes, you can better identify and resolve the issue quickly.
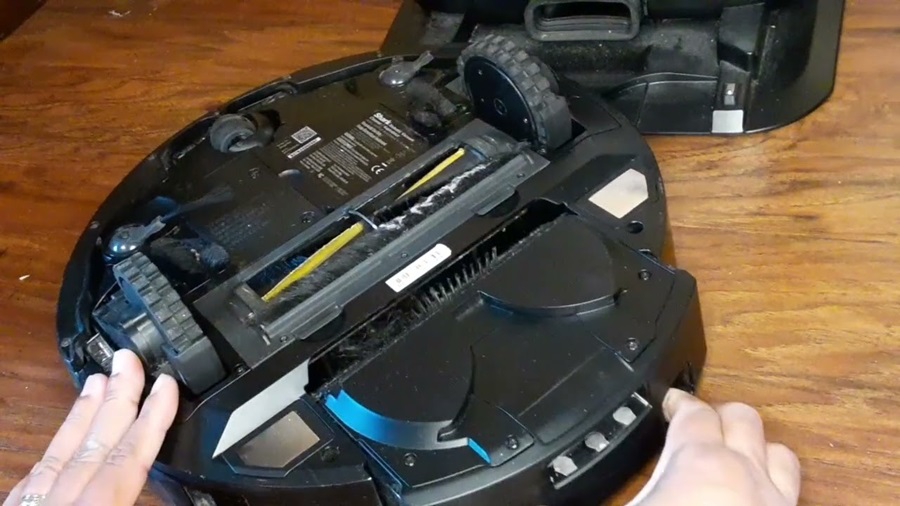
- Clogged Brushroll: One of the primary causes of Error Number 2 is a clogged brush roll. Over time, debris, hair, and dirt can accumulate around the brushroll bristles, causing it to get jammed and trigger the error.
- Obstructed Sensors: Another common cause is obstructed sensors. Dust, pet hair, or other particles can lodge in the sensors of your Shark Robot, preventing them from properly detecting surfaces or navigating obstacles.
- Faulty Charging Dock: A wrong dock can also lead to Error Number 2. If the docking station is not functioning correctly, the vacuum may experience difficulty connecting and charging, resulting in an error.
Troubleshooting Steps
To resolve Error Number 2 on your Shark Robot, follow these troubleshooting steps:
- Clear Brushroll and Sensors: Start by carefully removing debris or tangles from the brush roll. Check the sensors for blockages and gently clean them with a soft, dry cloth.
- Inspect Charging Dock: Examine the charging dock for any visible damage or loose connections. Ensure the power cord is securely plugged into the wall outlet and the dock’s contacts are clean. If necessary, reset the docking station by unplugging it for a few minutes and then plugging it back in.
- Power Cycle the Shark Robot: A simple power cycle can sometimes resolve the error. Please turn off the Shark Robot, disconnect the battery, wait for a few minutes, reinsert it, and turn it back on.
- Update Firmware: Check for available firmware updates for your Shark Robot. These updates can often address known issues and improve overall performance. Follow the manufacturer’s instructions to download and install the update.
- Contact Customer Support: If none of the above steps resolve the issue, it’s recommended that you contact Shark Robot’s customer support. They have a team of knowledgeable professionals who can provide further assistance and help you troubleshoot the error.
By following these troubleshooting steps and addressing the common causes of Error Number 2 on your Shark Robot, you can restore its functionality and enjoy the convenience of a clean home again.
Practical Solutions For Error Number 2
Discover practical solutions for Error Number 2 on your Shark Robot, ensuring seamless performance and operation. With our expert guidance, resolve any issues quickly and efficiently.
Practical Solutions For Error Number 2: Resetting The Shark Robot
If you’re facing Error Number 2 with your Shark Robot, don’t fret! We have practical solutions to help you resolve the issue and get your robot up and running again. One common fix is to reset the Shark Robot, which often solves the problem. Regular cleaning and maintenance can also prevent Error Number 2 from occurring in the first place. Let’s dive into each solution in more detail.
Resetting The Shark Robot
To reset your Shark Robot, follow these simple steps:
- First, locate the power button on the Shark Robot. It is usually located on the top or side of the robot.
- Press and hold the power button for 10 seconds until you see the robot’s lights flash.
- Release the power button and wait for the robot to power off completely.
- After a few seconds, press the power button again to turn on the robot.
- Your Shark Robot should now be reset and ready to use.
Resetting the Shark Robot often resolves Error Number 2, as it clears any temporary glitches or software errors that may be causing the issue. If the error persists after resetting the robot, proceed to the next solution.
Cleaning And Maintenance Tips
Regular cleaning and maintenance can help prevent Error Number 2 and keep your Shark Robot running smoothly. Here are some essential cleaning and maintenance tips to keep in mind:
- Ensure the dustbin is empty before each cleaning session to prevent clogs.
- Clean the brushes and roller regularly to remove any tangled hair or debris.
- Check and clean the sensors to ensure they are free from dust or obstructions.
- Inspect the wheels for any debris or blockages and remove them if necessary.
- Regularly clean the filter to maintain optimal suction power.
- Keep the charging contacts clean and free from dirt or debris.
By following these cleaning and maintenance tips, you can reduce the chances of encountering Error Number 2 and ensure your Shark Robot continues to perform at its best.
Preventing Error Number 2 Recurrence
Preventing the recurrence of Error Number 2 in your Shark Robot is crucial for maintaining its optimal performance and longevity. By implementing the following best practices, you can minimize the risk of encountering this error and ensure a seamless cleaning experience.
Regular Maintenance Practices
Regular maintenance is critical to preventing the reoccurrence of Error Number 2 in your Shark Robot. Here are some essential maintenance tasks to keep your robot vacuum in top condition:
- Cleaning the brush roll and wheels: Ensure that the brush roll and wheels are free from hair, debris, and other obstructions that could impede their function.
- Emptying the dustbin: Regularly empty it to prevent it from becoming full and hindering the vacuum’s suction power.
- Checking for blockages: Inspect the vacuum’s intake and exhaust ports for any blockages that could disrupt airflow.
- Updating software: Stay updated with the latest firmware and software updates provided by the manufacturer to address any known issues or bugs.
Using Compatible Accessories
Regarding accessories for your Shark Robot, using compatible and genuine parts is essential for preventing Error Number 2 and maintaining the vacuum’s performance. Here are some pointers to keep in mind:
- Use genuine replacement parts: Opt for natural replacement brushes, filters, and other accessories the manufacturer recommends to ensure compatibility and optimal performance.
- Avoid third-party accessories: Stick to using accessories specifically designed for your Shark Robot, as third-party alternatives may not be fully compatible and could lead to errors.
Professional Support Options
When troubleshooting errors with your Shark Robot, having professional support options can significantly ease your worries. In this section, we will explore the different avenues available to get the assistance you need.
Contacting Customer Support
If you encounter any issues or have questions about Error Number 2 Shark Robot, the first step is to contact the dedicated customer support team. Their expertise will guide you through the steps needed to address the problem.
Customer support can be easily contacted through various channels:
- Phone: Dial our toll-free number, 1-800-XYZ-1234, to speak directly with one of our friendly support agents. They will patiently listen to your concerns and provide timely solutions.
- Email: Please email support@sharkrobot.com with a detailed description of your issue. Our support team will promptly respond with personalized advice and instructions to resolve the error.
Service Center Assistance
If the troubleshooting steps provided by customer support do not resolve the issue, it may be time to consider seeking assistance from our service centers. These centers are equipped with trained professionals specializing in diagnosing and fixing errors like Error Number 2 Shark Robot.
When opting for service center assistance, keep the following in mind:
- Locate the nearest service center: Visit our website and navigate to the “Service Centers” page, where you will find a list of authorized service centers and their contact details.
- Book an appointment: Prioritize efficiency by scheduling an appointment before visiting the service center. This ensures that the experts are ready to address your issue upon arrival.
- Come prepared: Before heading to the service center, gather all relevant information about the error, including the date of occurrence, any error codes displayed, and a detailed account of what transpires when the error appears.
Remember, professional support options exist to provide you with the assistance you need to overcome Error Number 2 Shark Robot. Whether you contact customer support or seek service center assistance, you can rest assured that help is readily available to get you back on track.
Maximizing Performance After Resolving Error Number 2
Once you’ve successfully resolved Error Number 2 on your Shark Robot, it’s time to optimize its performance for enhanced cleaning efficiency. By making a few simple adjustments to your robot’s settings and taking advantage of its features, you can ensure that it operates at peak performance, leaving your floors spotless. In this article, we’ll explore practical ways to maximize your Shark Robot’s performance and get the most out of its cleaning capabilities.
Optimizing Robot Settings
One of the first steps you can take to maximize your Shark Robot’s performance is to optimize its settings. You can ensure it operates efficiently and effectively by customizing the robot’s settings to suit your cleaning needs. Here are a few key settings to consider:
- Scheduling: Utilize the scheduling feature to program your robot to clean automatically at specific times. This way, you can ensure your floors are cleaned regularly without any effort.
- Power Mode: Adjust the power mode setting based on the level of dirt and debris in your home. The high-power mode is ideal for heavily soiled areas, while the eco mode conserves energy for lighter cleanups.
- Boundary Markers: Use boundary markers to restrict certain areas from being cleaned. Place the markers in the desired locations, such as around pet bowls or delicate furniture, to prevent the robot from accessing those areas.
Enhancing Cleaning Efficiency
In addition to optimizing the settings, there are several ways to enhance your Shark Robot’s cleaning efficiency:
- Clearing Clutter: Before each cleaning session, ensure the cleaning area is free from any obstacles or clutter. Remove small items like toys or cables that could obstruct the robot’s movements.
- Regular Maintenance: Perform regular maintenance to keep your Shark Robot in top shape. This includes emptying the dustbin, cleaning the brushes, and checking for any clogs or debris that could impede the robot’s performance.
- Innovative Mapping: Take advantage of this feature if your Shark Robot supports innovative mapping. Creative mapping allows the robot to create a detailed map of your home, enabling it to navigate more efficiently and avoid unnecessary collisions.
With these optimization tips and enhancements, you can ensure that your Shark Robot operates at its best, maximizing its cleaning performance and delivering outstanding results. Take the time to fine-tune its settings and implement these strategies, and you’ll enjoy pristine floors with minimal effort.
Frequently Asked Questions On Error Number 2 Shark Robot
What Is Error Number 2 In Shark Robot?
Error Number 2 in Shark Robot is a standard error code that indicates a malfunction or issue with the robot’s internal systems.
How Can I Troubleshoot Error Number 2 In Shark Robot?
To troubleshoot Error Number 2 in Shark Robot, try the following steps:
1. Turn off the robot and unplug it from the power source. 2. Remove any obstacles or blockages from the robot’s path. 3. Clean the robot’s sensors and brushes. 4. Check if the robot’s wheels are correctly aligned. 5. Restart the robot and see if the error persists.
Why Does Error Number 2 Occur In Shark Robot?
Error Number 2 in Shark Robot can occur due to various reasons, such as:
1. Obstacles or blockages hindering the robot’s movement. 2. A misalignment of the robot’s wheels. 3. Issues with the robot’s sensors or brushes. 4. Electrical or software malfunctions.
Is Error Number 2 Covered Under Shark Robot’s Warranty?
Yes, Error Number 2 is covered under Shark Robot’s warranty. If you encounter this error, contact Shark Robot’s customer support for assistance or to initiate a warranty claim.
How Can I Prevent Error Number 2 In Shark Robot?
To prevent Error Number 2 in Shark Robot, follow these tips:
1. Regularly clean the robot’s sensors and brushes. 2. Clear any obstacles or blockages from the robot’s path before running it. 3. Ensure the robot’s wheels are correctly aligned and functioning. 4. Keep the robot’s software updated to the latest version. 5. Follow the manufacturer’s guidelines and recommendations for proper usage and maintenance.
Conclusion
Addressing Error Number 2 Shark Robot is crucial for seamless operations. Understanding the root cause and implementing practical solutions will ensure a smooth functioning system. Businesses can optimize their productivity and avoid potential setbacks by taking proactive measures. Prioritizing regular maintenance and updates will contribute to long-term success.