To set the time on a Samsung range with no clock button, you can do so through the settings menu. Access the settings menu on your Samsung range, locate the clock option, and manually adjust the time using the provided touchscreen or control buttons.
Samsung ranges are known for their innovative features and user-friendly interface. However, some models do not have a clock button, making it a bit challenging to set the time accurately. Fortunately, you can still configure the time on your Samsung range by accessing the settings menu.
We will guide you through the steps to set the time on your Samsung range in a few simple steps. Whether you’re a novice or an experienced user, this guide will help you navigate the settings and ensure your range displays the correct time. So let’s get started and learn how to set the time on your Samsung range with no clock button.
Understanding Time Settings On Samsung Range
Learn how to set the time on your Samsung range even if it doesn’t have a clock button. Easily navigate the time settings to ensure accurate timing for your cooking needs. Mastering this essential feature will make using your Samsung range a breeze.
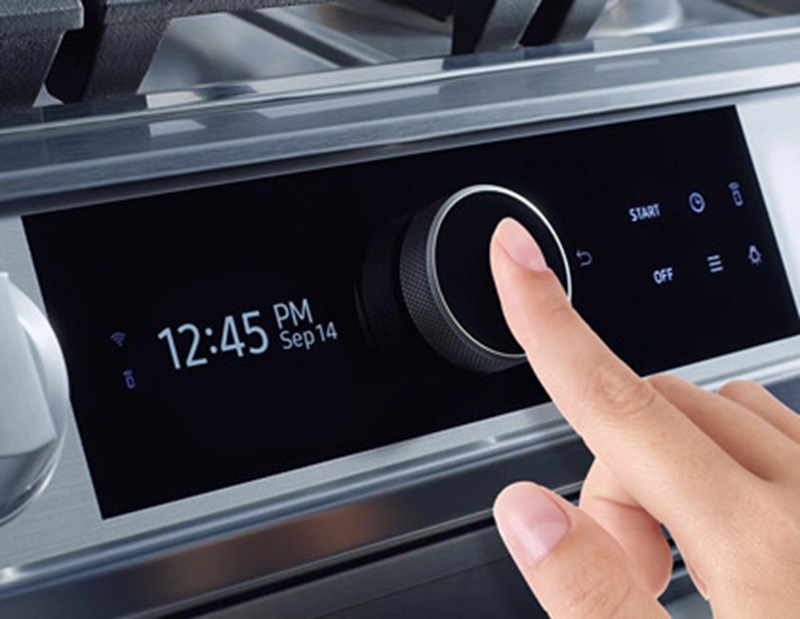
Understanding Time Settings on Samsung Range Setting the correct time on your Samsung range is essential to ensure accurate cooking times and to properly utilize its features. While some ranges have a dedicated clock button for this purpose, some Samsung models are designed differently, requiring you to access the time settings through a different method. In this blog post, we will guide you on how to access and set the time on your Samsung range, even if you don’t have a clock button. Accessing the Time Settings: To access the time settings on your Samsung range without a clock button, you will need to navigate through the range’s settings menu. Follow the steps below to access the time settings and set the clock: 1. Start by pressing the Menu button located on the control panel of your Samsung range. This will open the main menu where you can access various settings. 2. Using the arrow buttons or the dial control, navigate to the Time option in the menu. Press the Select button to enter the time settings. 3. Within the time settings, you will find options to set the current time, enable or disable the clock display, and adjust the clock format. Setting the Clock: Once you have accessed the time settings on your Samsung range, you can now proceed to set the clock. Follow the steps below to ensure that your range displays the correct time: 1. Within the time settings menu, locate the option to set the current time. Depending on your model, you may be able to set the time using the arrow buttons, the dial control, or a virtual keypad. 2. Use the appropriate controls to enter the hour and minute values for the current time. Pay attention to whether the time format is 12-hour or 24-hour, as this will determine how you enter the hours. 3. After setting the correct time, navigate to the option to enable the clock display. This will ensure that the current time is shown on the range’s control panel. 4. Finally, verify that the clock format is set correctly. Some models offer the option to display the time in either AM/PM or 24-hour format. Select the format that you prefer. By following these steps, you can easily set the time on your Samsung range, even if it doesn’t have a dedicated clock button. Ensuring that the correct time is displayed will not only help you keep track of cooking durations but also enable you to utilize features such as delay start and timer functions more effectively. Take a moment to access the time settings on your Samsung range and set the clock accurately to enhance your cooking experience.
Overcoming The Challenge Of No Clock Button
Setting the time on a Samsung range without a clock button may seem like a daunting task at first, but fear not! There are alternative methods that allow you to easily set the clock on your range and ensure your cooking times are accurate. In this blog post, we will walk you through two simple solutions to overcome the challenge of the clock button.
Alternative Methods For Setting The Clock
If your Samsung range doesn’t have a clock button, don’t worry. You can still set the time using alternative methods. Here are two ways to go about it:
- Using the Control Panel: Although your range may not have a designated clock button, it is likely to have a control panel with various buttons and options. Refer to your range’s user manual to find the specific buttons that control the clock settings. Once you’ve located the correct buttons, follow these steps:
- Press the “Settings” or “Menu” button on your range’s control panel.
- Navigate through the menu options using the arrow buttons until you find the clock setting.
- Press the appropriate button to enter the clock-setting mode.
- Use the arrow buttons to set the desired time.
- Press the “OK” or “Confirm” button to save the settings.
- Using the SmartThings App: If your Samsung range is compatible with the SmartThings app, you can take advantage of this convenient method to set the clock. Follow these simple steps:
- Download and install the SmartThings app on your smartphone or tablet.
- Open the app and sign in to your Samsung account.
- Tap on the menu icon and select your range from the list of connected devices.
- Navigate to the clock settings.
- Set the desired time using the app’s intuitive interface.
- Tap on the save button to apply the changes.
Utilizing The Oven Features For Time Management
While setting the clock is important for accurate cooking times, you can also utilize the oven’s features to enhance your time management in the kitchen. Here are some useful functions to take advantage of:
- Preheat: Use the preheat function to ensure your oven reaches the desired temperature before you place your food inside.
- Timer: Set the built-in timer on your range to keep track of cooking durations and prevent overcooking.
- Delay Start: If you want your oven to start cooking at a specific time, make use of the delay start feature. Simply set the desired start time, and your oven will begin cooking at the designated moment.
- Keep Warm: This function allows you to keep your food warm without overcooking it. Ideal for when you’re waiting for your guests to arrive or finishing up other meal preparations.
With these alternative methods and by utilizing the oven’s features, you can easily set the time on your Samsung range, ensuring accurate cooking times and efficient time management in your kitchen.
Optimizing Time-related Features For Efficient Cooking
When it comes to efficient cooking, optimizing time-related features on your Samsung range is essential for ensuring meals are prepared with precision and convenience. Whether you’re utilizing the delay start function or managing multiple cooking tasks with timer functions, knowing how to maximize these features can significantly enhance your cooking experience.
Utilizing the Delay Start Function
With Samsung ranges that lack a dedicated clock button, setting the time can be achieved by utilizing the delay start function. By engaging this feature, you can set a specific start time for cooking, allowing you to prepare ingredients in advance and have the range automatically initiate the cooking process at your desired time.
Using Timer Functions For Various Cooking Tasks
In the absence of a clock button, Samsung ranges offer timer functions that enable you to manage different cooking tasks effectively. Whether it’s monitoring the cooking duration for a specific recipe or coordinating multiple dishes simultaneously, the timer functions can be programmed to provide precise cooking times for optimal results.
Maximizing The Benefits Of Accurate Time Settings
Accurate time settings on your Samsung range can greatly enhance your cooking experience, ensuring precise cooking and allowing you to create and stick to schedules effortlessly. With the absence of a clock button on some models, you might wonder how you can take advantage of this feature. In this article, we will explore how you can maximize the benefits of accurate time settings, from enhancing cooking precision to creating cooking schedules.
Enhancing Cooking Precision
Accurate time settings play a crucial role in achieving perfect cooking results. Whether you’re baking a cake or roasting a turkey, setting the exact time can make all the difference. Without a clock button on your Samsung range, fear not! You can still set the time on your range by following these simple steps:
- Press the “Settings” button on the control panel.
- Select the “Time” option.
- Use the arrow keys to set the desired time.
- Press the “OK” button to confirm your selection.
By accurately setting the time, you can ensure that your dishes are cooked to perfection, achieving the ideal texture and flavour.

Creating Cooking Schedules
In today’s busy world, staying organized is key. With accurate time settings on your Samsung range, you can easily create cooking schedules to keep your meals on track. Here’s how:
- Start by determining the desired cooking time for each dish you plan to prepare.
- Take note of the cooking temperatures required for each recipe.
- Using the “Time” option in the settings menu, enter the appropriate cooking times for each dish.
- Set the temperature for each dish using the temperature control buttons.
- Arrange the dishes in the oven according to their cooking times.
- Start the cooking process, and your Samsung range will take care of the rest, signalling the completion of each dish based on the set time.
By creating cooking schedules with accurate time settings, you can effortlessly manage multiple dishes and ensure that everything is ready to serve at the desired time, resulting in a stress-free cooking experience.
Troubleshooting Common Time-related Issues
If you are facing issues with setting the time on your Samsung range, don’t fret! We are here to help you troubleshoot these common time-related problems. From addressing time display errors to dealing with resetting problems, we’ll guide you through the process step by step.
Addressing Time Display Errors
Is the time displayed on your Samsung range incorrect or not showing at all? Don’t worry, there are a few simple steps you can follow to resolve this issue:
- Check the Power: Ensure that your range is properly connected to a power source. Sometimes, a loose power connection can cause time display errors.
- Power Cycle the Range: Turn off the range by unplugging it from the power source. Wait for a few minutes and then plug it back in. This can often help reset the system and rectify any display errors.
- Adjust Time Settings: Access the settings menu on your range’s control panel. Look for the clock settings option and make sure the correct time is set. If the time is still incorrect, consider changing the time zone settings accordingly.
Note: If the above steps don’t resolve the time display errors on your Samsung range, it may be necessary to seek professional assistance. Contacting Samsung customer support or scheduling a service visit can help diagnose and fix the underlying problem.
Dealing With Resetting Problems
Is your Samsung range constantly resetting the time after a power outage or whenever it’s unplugged? Here are some troubleshooting tips:
Power Surge Protector:
Consider using a power surge protector:
| If you frequently experience power outages or surges in your area, using a power surge protector can help safeguard your range’s settings, including the time. |
Backup Power:
Investigate a backup power supply:
| If power interruptions are a common occurrence, consider investing in an uninterrupted power supply (UPS) or backup generator. These backup power sources can help maintain your range’s settings, preventing time resetting issues. |
Factory Reset:
Perform a factory reset as a last resort:
| If all else fails, you can try performing a factory reset on your Samsung range. However, keep in mind that this will erase all personalized settings, so it should be considered as a last resort. |
By following these troubleshooting steps, you’ll be on your way to setting the time on your Samsung range successfully. If problems persist, it’s recommended to contact Samsung’s customer support for further assistance.
Frequently Asked Questions For Set Time On Samsung Range With No Clock Button
How Do I Set The Time On A Samsung Range Without A Clock Button?
To set the time on a Samsung range without a clock button, you can navigate through the control panel’s settings to the clock option and manually adjust it.
Can I Use The Oven Without Setting The Time On My Samsung Range?
Yes, you can use the oven on your Samsung range without setting the time. However, setting the time is necessary for accurate baking and cooking.
What Should I Do If My Samsung Range Does Not Have A Clock Button?
If your Samsung range does not have a clock button, you can refer to the user manual or contact Samsung customer support for specific instructions on how to set the time.
Is It Possible To Set The Time On A Samsung Range Using The Microwave Button?
No, the microwave button on a Samsung range is not used for setting the time. You need to navigate through the control panel’s settings to find the clock option.
Why Doesn’t My Samsung Range Have A Clock Button?
Some models of Samsung ranges do not have a physical clock button as the time can be set through the control panel’s settings. This design allows for a streamlined appearance on the range’s control panel.
Setting the time on a Samsung range without a clock button doesn’t have to be a daunting task. By following the simple steps and utilizing the available features, you can easily accomplish this task. With a little practice, you’ll become familiar with the process and be able to set the time effortlessly.