
You open your refrigerator and discover that the chicken breasts you bought just three days ago have already turned a questionable shade of gray. The fresh strawberries you were saving for dessert have gone soft and fuzzy. You tell yourself it is time for a change, but the price tags on those expensive vacuum sealers make you hesitate. The good news is that keeping food fresh does not require a four-hundred-dollar machine. With the right approach, you can stop wasting food and money by using an affordable vacuum sealer. These compact devices remove air, lock in freshness, and give you weeks or even months of extra shelf life. Whether you are stocking up during sales or meal-prepping for a busy week, a budget-friendly sealer can transform how you store food. This article will walk you through everything you need to know about choosing and using a budget-friendly device that delivers professional results without breaking your bank
What Makes a Vacuum Sealer Effective for Food Storage?
A vacuum sealer works by removing air from a bag or container before creating an airtight seal. This process eliminates oxygen, which causes oxidation and spoilage. By starving bacteria and mold of the air they need to grow, vacuum sealing extends the life of fresh foods by three to five times compared to standard storage methods.
The Science Behind Air Removal and Spoilage Prevention
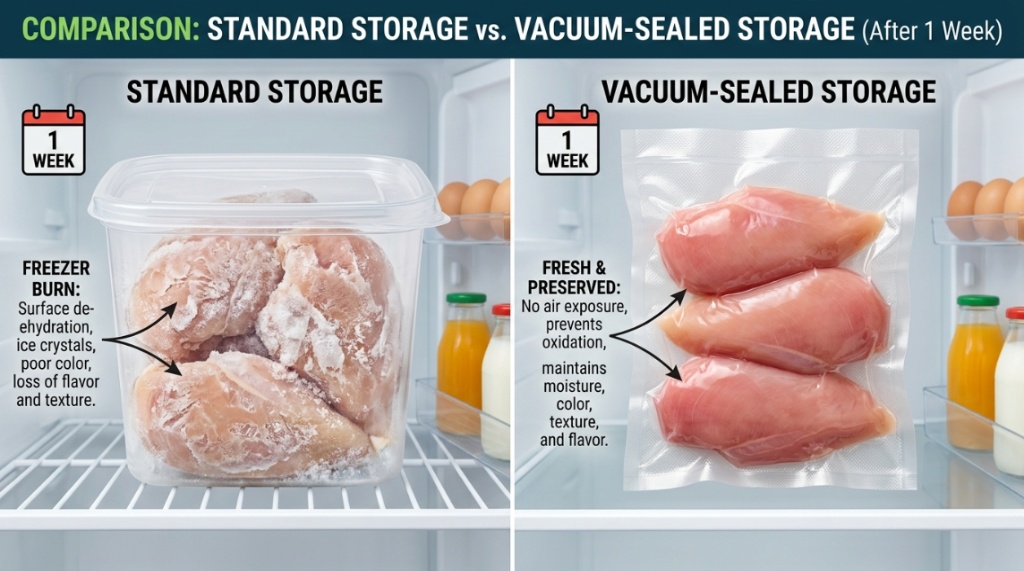
Oxygen is the primary enemy of fresh food. When you expose meats, vegetables, and leftovers to air, enzymatic reactions occur that lead to discoloration, texture changes, and bacterial growth. Vacuum sealing removes up to ninety-nine percent of the air, creating an anaerobic environment that dramatically slows spoilage. This same principle keeps frozen foods from developing freezer burn, because ice crystals cannot form on surfaces that are not exposed to air.
How Budget Models Compare to High-End Machines
Budget vacuum sealers typically use a single-piston pump and offer fewer automatic settings than premium models. However, most affordable units are perfectly capable of sealing dry foods, frozen items, and even moist foods with a manual pulse mode. The main trade-offs are slower sealing speed and fewer bag size options. For a typical household, these limitations rarely matter. A well-built budget unit can last years with proper care, making it a sensible investment for most home cooks.
Key Features That Define Performance in Affordable Units
When shopping for a budget sealer, look for a machine with at least one manual seal option, a built-in bag cutter, and a removable drip tray. These features make the device easier to use and clean. Machines with adjustable seal time settings are especially helpful for handling different bag thicknesses. Some budget models also include a vacuum-only mode for use with canisters and jar attachments, adding versatility without raising the price significantly.
Why Should You Use a Vacuum Sealer for Meal Prep?
Meal prepping with a vacuum sealer saves you time, money, and stress. By sealing individual portions of cooked meals, raw proteins, or fresh produce, you can prepare a week or more of food in one session. The vacuum seal preserves flavor and texture far better than plastic wrap or standard containers, ensuring that your Tuesday dinner tastes as good as it did on Sunday.
Portion Control and Reduced Food Waste
When you buy in bulk, you save money per pound, but only if you can use everything before it spoils. A vacuum sealer allows you to divide large packages into single-serving portions. You can freeze chicken breasts individually, seal half a block of cheese, or portion out ground beef for tacos. This approach eliminates the need to thaw an entire package when you only need a little, reducing waste and encouraging smarter eating habits.
Faster Marinating and Flavor Infusion
Vacuum sealing does not just preserve food, it can also improve it. When you seal meat with a marinade, the absence of air pressure causes the marinade to penetrate deeper and faster. What normally takes hours can happen in under thirty minutes. This trick works well for chicken, fish, pork, and even vegetables, giving you restaurant-quality flavor with minimal effort.
Sous Vide Cooking Compatibility
If you enjoy sous vide cooking, a budget vacuum sealer is essential. The water bath technique requires food to be sealed in airtight bags to cook evenly and safely. Affordable vacuum sealers handle this task excellently, and you do not need a high-end machine to get consistent results. Many budget models include a pulse function that prevents liquids from being sucked into the machine while sealing wet marinades.
Which Foods Benefit Most from Vacuum Sealing?
Not all foods store equally well under vacuum. Meats, hard cheeses, dry goods, and most vegetables perform beautifully. Delicate fruits, soft cheeses, and foods with sharp edges require slightly different handling. Understanding which foods work best helps you get the most value from your machine without frustration.
Meats, Poultry, and Seafood Storage Guidelines
Raw meats and fish are the top candidates for vacuum sealing. A vacuum-sealed steak can last two to three years in a deep freezer without losing quality, compared to six months in standard packaging. Always pat meat dry before sealing to remove excess moisture, which can interfere with the seal. For ground meats, flatten the package before sealing to save space and allow faster thawing.
Hard Cheeses and Dairy Products
Hard cheeses like cheddar, parmesan, and gouda store exceptionally well under vacuum. The lack of air prevents mold growth and keeps the cheese from drying out. Soft cheeses such as brie or fresh mozzarella compress under vacuum and lose their texture. If you must seal soft cheese, freeze it first and use a gentle vacuum setting to minimize crushing.
Dry Goods, Grains, and Coffee Beans
Flour, rice, oats, pasta, and coffee beans benefit greatly from vacuum sealing. Removing air keeps pests out and prevents moisture from causing clumps or spoilage. Sealed coffee beans stay fresh for weeks longer than beans stored in a bag with a one-way valve. This is a great way to buy staple items in bulk without worrying about pantry moths or staleness.
How Do You Choose the Right Budget Vacuum Sealer?
Selecting a vacuum sealer on a budget means focusing on reliability and essential features rather than bells and whistles. A good budget model should seal consistently, handle both dry and moist foods, and fit comfortably on your countertop. Reading reviews and comparing specifications helps narrow down the best options available in your area.
Must-Have Features for Home Cooks on a Budget
Look for a sealer with at least two seal modes: dry and moist. This allows you to switch between sealing dry beans and juicy chicken thighs without ruining the bag. A built-in cutter and bag roll storage simplify setup. External vacuum sealers are generally more affordable and easier to maintain than chamber sealers, making them the right choice for most households. Machines with a removable drip tray are easier to clean, which extends the life of the unit.
Comparing Price Ranges and Performance Expectations
Budget vacuum sealers typically fall between thirty and seventy dollars. At the lower end, you may find fewer features and less durable seals, but many units in this range still perform well for occasional use. In the fifty-to-seventy-dollar range, you often get stronger suction, better seal bars, and additional settings. Investing a little more upfront often saves frustration later. If you are looking for reliable options available locally, you can find excellent budget vacuum sealers Texas that balance affordability with dependable performance for everyday meal prep and long-term storage.
Brands and Models Worth Considering
Several brands dominate the budget vacuum sealer market. FoodSaver offers models starting around fifty dollars that include standard features and brand-compatible bag rolls. Nesco and Anova also produce affordable units with strong suction and good warranty coverage. Geryon and Mueller have budget-friendly options with manual controls that give you more flexibility. Reading user reviews about seal durability and noise levels helps you pick a model that fits your kitchen routine.
What Are the Biggest Mistakes People Make with Budget Sealers?
Even the best budget sealer will underperform if used incorrectly. Common mistakes include overfilling bags, sealing wet foods without pre-freezing, and ignoring the need for regular cleaning. Avoiding these errors saves you money on wasted bags and spoiled food.
Overfilling Bags and Poor Bag Placement
Filling a bag too full leaves insufficient space for a proper seal. Most machines require at least three inches of empty bag material above the food to create a strong closure. Also, placing food too close to the open end can cause liquid or crumbs to enter the vacuum channel, preventing a tight seal. Always leave adequate headroom and wipe the bag opening clean before sealing.
Sealing Wet or Moist Foods Incorrectly
Liquids and juices can be sucked into the vacuum pump, damaging the machine and ruining the seal. To avoid this, freeze moist foods for one to two hours before sealing, or use the pulse function to stop the vacuum before liquid reaches the seal bar. Many budget models include a moist food setting that reduces suction speed, which helps prevent this issue.
Neglecting to Clean the Drip Tray and Seal Bar
Food debris and liquid residue accumulate on the seal bar and drip tray after repeated use. This buildup weakens seals and can cause the machine to malfunction. Wipe the seal bar with a damp cloth after each use and empty the drip tray regularly. A few seconds of maintenance keeps your budget sealer running smoothly for years.
How Can You Maximize the Lifespan of a Budget Vacuum Sealer?
A budget vacuum sealer can last for several years with proper care. Simple habits like using the correct bag type, allowing the machine to cool between cycles, and storing it in a dry place make a significant difference. Treating your sealer gently prevents common failures and saves you from buying a replacement too soon.
Choosing the Right Bags and Rolls
Budget sealers work best with bags designed for external vacuum machines. Using smooth-sided bags rather than textured ones helps maintain seal integrity. Pre-cut bags are convenient, but rolls are more economical. Cut bags to the exact size needed to minimize waste. Avoid using regular plastic bags, as they will not seal properly and can damage the heating element.
Letting the Machine Cool Between Sealing Sessions
Sealing generates heat, and budget machines have smaller cooling systems than commercial units. If you are sealing dozens of bags in one session, allow the machine to rest for thirty seconds between each seal. Overheating can weaken the seal bar and shorten the machine’s life. A short pause between bags prevents this and ensures consistent results.
Storing the Sealer Properly When Not in Use
Keep your vacuum sealer in a dry area away from direct sunlight and moisture. Humidity can damage internal components and promote mold growth on the seal bar. If you have limited counter space, store the machine in a cabinet with the cord wrapped loosely. Avoid stacking heavy items on top of the sealer, as this can warp the housing or misalign the seal bar.
Can You Use a Vacuum Sealer for Freezer Storage?
Yes, vacuum sealing is one of the best methods for freezer storage. Removing air prevents freezer burn, which occurs when moisture on the food surface evaporates and leaves dry, discolored spots. Vacuum-sealed foods maintain their original texture, color, and flavor much longer than foods stored in standard packaging.
How Vacuum Sealing Protects Against Freezer Burn
Freezer burn happens when air reaches the surface of frozen food. Even small air pockets inside a bag can cause damage over time. Vacuum sealing eliminates almost all air, creating a tight barrier that protects food from the cold, dry air inside your freezer. Meats sealed this way stay fresh-looking for over a year.
Best Practices for Freezing Liquids and Sauces
Liquids expand when frozen, so leave extra space in the bag. Portion soups, broths, and sauces into flat, even layers before sealing. Lay the filled bag flat in the freezer until solid, then you can stack them upright to save space. This method works well for stocks, chili, and even leftover pasta sauce.
Thawing Vacuum-Sealed Food Safely
Vacuum-sealed food thaws quickly in cold water because the bag provides a waterproof barrier. Submerge the sealed bag in cold tap water, changing the water every thirty minutes until thawed. You can also place sealed bags directly in the refrigerator overnight. Avoid using hot water, as it can partially cook the outer layer of meat before the center thaws.
How Do You Seal Different Types of Food Effectively?
Different foods require slightly different sealing techniques to get the best results. Adjusting your approach based on the food’s moisture level, texture, and shape helps you avoid seal failures and food spoilage.
Sealing Dry Goods and Powders
Dry items like flour, sugar, and coffee grounds seal easily. Use the dry setting on your machine and ensure the bag opening is free of dust. For powdery ingredients, fold the top of the bag over once before sealing to create a barrier that keeps particles away from the seal bar. This simple trick prevents weak seals and mess.
Sealing Fresh Vegetables and Fruits
Many vegetables release ethylene gas as they ripen, which can cause them to spoil faster inside a sealed bag. Blanching vegetables like green beans, broccoli, and carrots before sealing stops enzyme activity and preserves color and texture. Fruits like berries freeze well without blanching, but they crush easily. Freeze them on a tray first, then transfer them to a vacuum bag for sealing.
Handling Sharp Edges and Bone-In Cuts
Bones and sharp edges can puncture vacuum bags, ruining the seal and exposing food to air. Wrap sharp corners with a layer of paper towel or use bone guard material designed for this purpose. Alternatively, double-bag items with rough edges to provide extra protection. This is especially important for pork chops, chicken legs, and fish with backbones. Budget sealers aren’t just for meats and veggies. If you do a lot of baking, you can portion out chunks of fats and oils to keep them from absorbing fridge odors. For instance, understanding Non-Pan Margarine what it means, and how to use it can help you properly portion and seal alternative fats for long-term freshness.
Frequently Asked Questions
Can you reuse vacuum sealer bags?
Yes, you can reuse bags if they are not contaminated with raw meat juices or spoiled food. Wash them thoroughly with hot soapy water, dry completely, and cut off the old seal before using again. Reusing bags reduces waste and saves money.
How long does vacuum-sealed food last in the refrigerator?
Most vacuum-sealed foods last three to five times longer than food stored in open containers. Raw meats stay fresh for up to two weeks, cheeses last one to two months, and prepared meals remain edible for two to three weeks under refrigeration.
Do vacuum sealers work with any plastic bag?
No, standard plastic bags do not have the channeled texture that allows air to escape during vacuuming. Only use bags or rolls specifically designed for external vacuum sealers to ensure proper sealing and long-term storage.
Can you vacuum seal bread without crushing it?
Yes, freeze bread slices or whole loaves first for one hour, then seal them on a low or gentle vacuum setting. The frozen bread holds its shape and does not compress during sealing. This keeps bread fresh for months without becoming stale or moldy.
Is it safe to vacuum seal raw meat without freezing it first?
Yes, vacuum sealing raw meat is safe for refrigeration or immediate freezing. However, because vacuum sealing creates an anaerobic environment, you must store meat at proper temperatures. Keep refrigerated meat below 40 degrees Fahrenheit and use it within two weeks for best quality.
What should you not put in a vacuum sealer?
Avoid vacuum sealing raw mushrooms, soft cheeses, delicate berries, and foods with sharp edges without protection. Also, do not seal carbonated beverages or volatile liquids, as the vacuum process can cause them to foam or expand dangerously.
How do you clean a budget vacuum sealer?
Unplug the machine and remove the drip tray. Wash the tray with warm soapy water and dry thoroughly. Wipe the seal bar and gaskets with a damp cloth. Do not submerge the main unit in water. Allow all parts to dry completely before reassembling.
Conclusion
Keeping food fresh does not require expensive equipment or complicated techniques. A budget vacuum sealer puts professional-level food preservation within reach of any home cook. By understanding which foods seal best, how to avoid common mistakes, and what features matter most, you can extend the life of your groceries, reduce waste, and save significant money over time. Whether you are meal-prepping for the week, stocking a deep freezer with sale items, or experimenting with sous vide cooking, an affordable vacuum sealer is a practical tool that pays for itself. Start by identifying a reliable model that fits your kitchen and your budget. Practice with dry foods first, then move on to moist items and frozen goods. With a little attention to technique and maintenance, your budget vacuum sealer will serve you well for years, keeping your food fresher and your kitchen more efficient.